We’re excited to announce our next change tool, the Parameter Editor and standardize tool for Crystal Reports is released.
For those familiar with how our desktop Parameter Editor for Crystal Reports worked, the premise is similar in concept and just like our Crystal Reports Formula Editor tool and Crystal Reports Change Data Source tool, we’ve streamlined the process and improved it based on your feedback.
As with other .rpt Inspector Online tools, you start by selecting the report(s) for which you want to make parameter changes and then click on the Crystal Reports Parameter Editor tool in the left side navigation. Then specify the interaction you’d like to make – Edit Parameters or Standardize (see below for an explanation of each interaction) and select the specific parameter(s) from the previously selected report(s). Hovering over a parameter will show you a parameter prompting text preview so you know you’re selecting the correct one. Once satisfied with your change(s), save them back to the report(s).
Edit Parameters
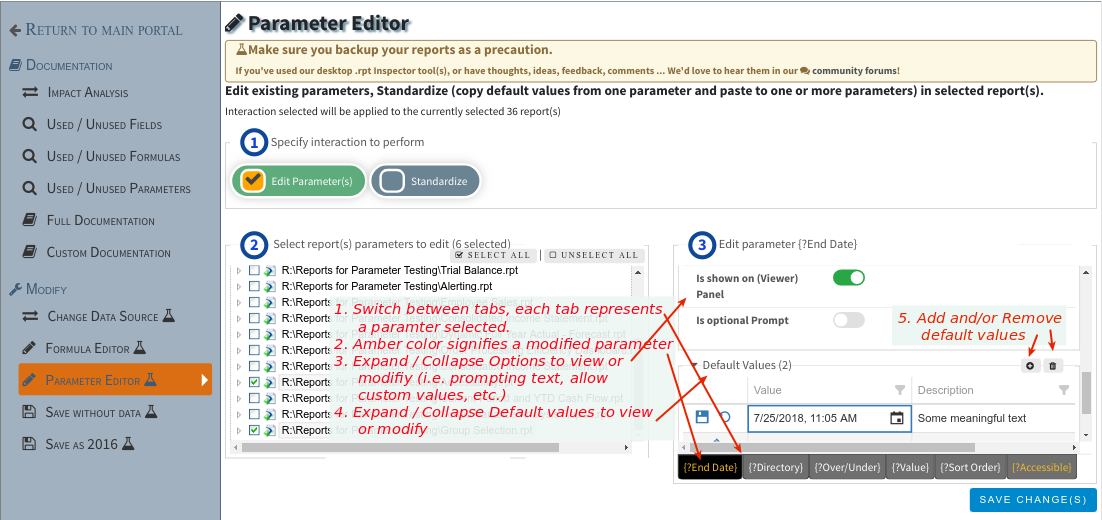
In short, selecting the interaction as Edit Parameters, provides a parameter editor to modify the parameter options as well as modify / add / remove the default values and their descriptions. For each parameter you select to edit, it is opened and represented as a tab under the parameter editor. You can then hover over each tab to see additional details about the parameter (such as the report file name, title, and whether it’s used in the report) and click on each tab to see the actual parameter options and default values in the editor as well as make change(s) to it. Once you make a change to the parameter, the tab’s text color will change to amber so you can easily spot changed tab(s). See Edit Parameters screenshot below.
Standardize
Selecting the interaction as Standardize will allow you to quickly and easily copy the same parameter options and/or default values to other parameters, across one or multiple reports. You start by selecting the source parameter. Hovering over a parameter will show a parameter preview so you know you’re selecting the correct one. Then specify as many parameters, across one or multiple reports that you’d like to copy to (these are referred to as destination parameters). Each of the destination options and/or default values will be overwritten with the selected source parameter options and/or default values once you save the changes. Standardize Parameters screenshot below.
Note 1: If the destination data type doesn’t match the source data type (i.e. the source is a string but the destination is a date), the destination parameter(s) won’t be allowed for selection.
Note 2: In a future update we’ll add support for importing default values from external sources as well as exporting default values. Please let us know which import and export formats are important to you and of course any additional features that will make this tool helpful to you.
Once available for your preview, this tool will carry our labs icon, which means that you should make sure that you backup your reports before using as we’re still testing this tool and evolving its features. We’d love to hear your thoughts.
Edit Parameters screenshot
The below screenshot shows 36 reports selected, and 6 parameters selected across 4 reports to make changes. 2 parameters, the {?End Date} parameter default values have been modified and the {?Accessible} parameter options have been modified.
Standardize Parameters screenshot
The below screenshot shows 35 reports selected, a parameter selected to use as the source (this is the parameter that the options and/or default values will be used to copy from) and 6 parameters across many reports have been selected as the destination (these are the parameters that will be copied to). As selected in step 4, only default values will be copied.
